Image Slider

Showing posts with label food and drink. Show all posts

Smoked and Pulled Pork

Tuesday, September 11, 2012
Andy makes delicious pulled pork and since we hadn't had it all summer, I requested it for Labor Day. We hadn't made it since 2010 but had done a good job documenting and after making it again, I think the recipe is perfect (remember, it's not mine, it's Andy's so I can say that).

This makes a lot but the leftovers are delicious. We had sliders a few nights, then pork quesadillas and wish we would have made pork nachos. But the remainder of the pork was enjoyed by the boys while watching the Redskins. Perfect football food.


Andy's Pork Butt

Brine the Butt (Alton Brown’s Method)
2 quarts water
¾ cup molasses
1 cup salt

Mix ingredients together. Add the 6-8lb bone-in pork butt (aka pork shoulder). Brine overnight.

Make Barbeque Sauce
1 cup ketchup
⅔ cup cidar vinegar
½ cup brown sugar
½ cup tomato paste
1 T mustard
1 t cumin
1 t coriander
1 T chili powder
1 T onion powder
1 T paprika

Mix ingredients together. Cover and refrigerate overnight.

Slow cook the butt in the crock pot.
After the butt has been in the brine for 12-24 hours, remove it from the brine and cover it in the sauce. Place it in the crock pot on top of some onion slices. Pour remaining sauce over the pork. Cook for 6-8 hours on low.

Smoke the butt
Brush off excess sauce. Smoke the butt for 2 hours (or less if you just don't have time but don't skip this step!). If you don't have a smoker (and we certainly don't... maybe when we buy a house!), you can make a make-shift one. Soak wood chips for about 30 minutes. Drain the wood chips and place them in an aluminum pan. Cover the pan tightly with foil and poke holes in the foil. Place the "smoker" over direct heat on the grill and put the pork butt on indirect heat. Cover the grill and let the smokin' begin (which will take about 10-15 minutes).

Boil sauce
Into a saucepan, strain the onion and little bits from the sauce and pork drippings in the crock pot. Boil the sauce until it reaches the desired consistency (about 30-45 minutes), skimming the fat as you can.

Enjoy!
Let the butt rest for 30 minutes – 1 hour before shredding with two forks or your hands. Toast some buns (we love it with Sister Schubert dinner rolls). Serve with the sauce.

Summer Vegetable Bake

Wednesday, July 11, 2012
It's become apparent that I'm the type of person that gets more done when I have more to do. Obvious statement of the day? What I mean is that when I have tons going on (say, at work), I'm able to keep up that momentum and get lots of other stuff done (like at home). But when I am not very busy, I tend to waste time and wonder what in the world I've been doing for 3 hours. The last few weeks have been examples of that. I've fallen off the blog wagon because I don't mentally schedule it in and then it never gets done. Yada, yada, yada. That's all going to stop now.

At supper club last night, one of the girls said "if I don't write it down on a list, it doesn't happen because I look at my list, don't see anything and think I have nothing to do." That's totally true for me too. I tried for a while not to keep lists... heard it would keep your brain from turning to mush. Well I'm just going to have a mushy brain but I'll be getting stuff done!

Now for a total 180... a summer vegetable bake. I saw this receipe on Pinterest (obvi) which is sort of like a list, right? It was perfect because I had some zucchini that I'd received from someone's garden. I'm not typically a zucchini person but this was delicious.

Summer Veggie Bake
Adapted from For the Love of Cooking

I probably would not have made any changes to the original recipe, but I was rushed. Worked later than expected, hadn't eaten all day, got home and wanted to order take-out but we had everything we needed at home. I didn't have time to saute the onion before hand and I wanted it to cook as quickly as possible.

1 zucchini
1-2 yellow squash
1 medium yellow onion
1 russet potato
3 plum tomatoes
½ grated Parmesan cheese
½ cup Panko bread crumbs
Olive oil
Garlic salt & pepper

Preheat oven to 425 degrees. Wash all the veggies. Slice the zucchini, squash and potato into very thin slices. Slice the tomato and onion into about a quarter inch slices. You may have to half or quarter the potato and onion slices so that each piece is a uniform size in diameter.


In a greased round baking dish (a pie pan would also work for this), overlap the veggies as you go around the outside of the pan. Continue until you fill the pan. Season with garlic salt and pepper and drizzle with olive oil.


Bake for about 25 minutes. Remove pan from the oven and sprinkle with Parmesan cheese and Panko and drizzle with a little more olive oil. Continue to bake until it's browned, about 20 more minutes.
 

Avocado Toast

Thursday, July 5, 2012
I don't know why it took me so long to become acquainted with avocado toast, but I'm certainly glad I am now! When we were in the Hamptons a few weekends ago, we ordered avocado toast as our breakfast appetizer (yes, you can have appetizers at any meal). Um, delicious.

This is the perfect breakfast or afternoon snack-- filling, nutritious, and most importantly so tasty.


Avocado Toast
Inspired by La Bodega in Montauk, NY

½ Avocado
1 or 2 slices whole grain or Cuban bread
Red pepper flakes
Kosher salt
Honey

While you're bread is toasting, lightly smash the avocado. Top the toast with the avocado, drizzle with honey and sprinkle with kosher salt and red pepper to taste.

Orzo with Artichoke Pesto, Grilled Corn and Tomatoes

Thursday, June 28, 2012
If the skirt steak and chimichurri is my new easy summer dinner, then this is my new summer go to dish-- Orzo with Artichoke Pesto, Grilled Corn and Tomatoes.  It's a great light dinner, side dish (with grilled chicken would be yum) or the perfect lunch.  Neither Andy nor I are big artichoke people-- love the flavor, not keen on the texture.  Well, this solves that problem since the artichokes are pureed in the pesto.


Orzo with Artichoke Pesto, Grilled Corn and Tomatoes
Adapted from Giada

Artichoke Pesto
1 (8-ounce) pack frozen artichoke hearts, thawed or 16oz jar of artichoke hearts in oil, drained
½ bunch flat leaf parsley
A few sprigs of fresh basil
½ cup chopped walnuts, toasted
1 lemon, zested and juiced
3 cloves garlic
Few glugs of olive oil
Salt and pepper to taste

Combine all of the ingredients in a food processor and pulse until combined.

Orzo with Artichoke Pesto, Grilled Corn and Tomatoes
4 ears corn
1 pint cherry tomatoes
1⅓ cups orzo

Prepare orzo according to the package directions for 4 servings (224g uncooked).

Shuck the corn and rub it with a little olive oil. Place the corn directly on the hot grill and cook for about 4 minutes, turning to grill all sides. After it's cooked, cut it off the cobs.

Cut the cherry tomatoes in half.

In a large bowl, combine the cooked orzo, corn and tomatoes. Top with pesto and toss until combined.


Summer Supper

Tuesday, June 26, 2012
We enjoyed a great dinner on the roof on Saturday, but this could easily be a week night dinner. I need to remember that skirt steak is the perfect match for a week night dinner. It doesn't have to be marinated and it cooks in 5 minutes.


Skirt Steak with Chimichurri
Inspired by Everyday Occassions

Half bunch of flat leaf parsley
Few basil leaves
2 cloves garlic
½ cup olive oil
4 tsp balsamic vinegar
½ lemon, juiced
1 tsp salt
½ tsp ground black pepper
¼ tsp red pepper flakes
Skirt steak

Combine all ingredients in a food processor and blend until combined.

Season skirt steak with salt and pepper.  Cook on a very hot grill for 3 minutes on one side, flip and 2 minutes on the other side.  Let rest for a few minutes before slicing, on the diagonal, against the grain. Serve chimichurri sauce over the steak.


Succotash
Inspired by Camille Styles

Corn, either frozen or fresh
Edamame, shelled
Cherry tomatoes, halved
Red bell pepper, diced
Vidalia onion, diced
Butter
Lemon
Salt & Pepper
Fresh basil

Have you noticed I'm not that great with measurements?  I'm fine with it for baking but cooking? Um, not so much.  I think it's because it doesn't really matter.  Really like edamame? Use a lot!  Prefer corn? Double up.

In a large skillet, melt some butter and saute the onions until translucent.  If you're using any frozen veggies (e.g. corn, edamame), add those and cook until heated through.  Add any fresh veggies (e.g. corn that's been cooked/grilled/boiled/baked, red pepper, and tomatoes) and saute until heated through.  Season with salt and pepper.  Right before serving, squeeze some fresh lemon juice over the dish and add fresh basil.

Cheese Cookies

Thursday, June 7, 2012
Technically, these are Cheese Wafers, but I call them Cheese Cookies and I'm addicted (confession: I ate them for dinner one night this week when Andy wasn't home). We always have them at the Farm thanks to sweet Emma. There's usually a batch in the freezer, just waiting to be toasted up (and a few frozen ones popped for those too impatient to wait). They're perfect to keep in the freezer so you always have a tasty nibble if company stops by.


Cheese Cookies
Adapted from Cooking Through Rose Colored Glasses

2 sticks butter, softened (like leave it out overnight)
2 cups grated sharp cheddar cheese, packed
2 cups flour
1 tsp salt
2 Tbs hot sauce
2 cups crispy rice cereal

Preheat the oven to 350. Prepare 2 cookie sheets by spraying with nonstick spray (no need to respray between batches).

In a large bowl, combine the butter with the grated cheese. Get in there with your hands; it's the only way to do this. After they're completely combined, add the flour and salt, a little bit at a time. Continue to knead with your hands until combined. Add the hot sauce and crispy rice cereal and knead until everything comes together.

Take a heaping half teaspoon of dough (yes, just a half teaspoon... these are best when they're small) and roll it into a ball. Place it on the cookie sheet and smush a little bit. Continue until the sheet is full. Cook at 350 for 8-10 minutes until just starting to get a color. You don't want them to brown if you're planning on freezing them. While one sheet is cooking, form the dough balls for the other sheet. The cookies crisp up as they cool.

If you're not going to eat them all immediately (the recipe makes a pretty big batch), these freeze great! Just cool them and place them in an airtight container. To reheat, place frozen cookies on a cookie sheet and bake at 350 for 7-9 minutes.

Potato Salad for Those That Don't Like Potato Salad

Wednesday, May 23, 2012
I'm not exactly sure when we came up with this recipe... I know it was when I was living in Dallas and Andy was in DC because I knew he liked it when he emailed me asking for the recipe. Success!


Potato Salad

Red New Potatoes
Regular New Potatoes
Red Onion
Fresh dill, lots of it, more than you think you'll want
Olive Oil
Red Wine Vinegar
Salt and Freshly Ground Pepper

Wash the potatoes and cut them into bite size pieces. I like mine in bigger chunks rather than smaller pieces but to each his own. Also, I don't peel the potatoes, I leave the skin on. Put the cut potatoes into enough salted, room temperature water to cover. Turn the pot on and boil the potatoes until they are just fork tender-- don't over cook. Drain.

While the potatoes are cooking, slice the red onion into very thin slices. Next, make the vinaigrette. Wash and roughly chop the dill. In a jar or container with a water-tight lid, combine the olive oil, red wine vinegar, red onion, salt, pepper and dill. I do 1 part Red Wine Vinegar to 2 parts Olive Oil (i.e. 1/2 cup Red Wine Vinegar to 1 cup Olive Oil). Use as much dill as you want, but since it's the primary flavor, make sure you use enough! Shake until combined. Taste the vinaigrette to make sure the seasoning is right.

Pour the vinaigrette over the warm potatoes and toss to coat. Refrigerate overnight and test the seasoning the next day. Adjust accordingly.

Leftover Tip: the potato salad is delicious roasted in the oven or in a skillet and served as a warm side dish!

Pinterest Cooking

Tuesday, April 24, 2012
It's been oh I have 4 months until we go to FL... still have 3 months until our trip to FL... I can get in shape in 2 months before we go to FL.  Now it's oh no, we go to FL in two weeks... I have to put on a swim suit?!  Thank goodness we hit up the JCrew outlet this weekend and I invested heavily in cute coverups and maxi-dresses.  But there's still time to cram, right?  We're trying our best to eat healthy.. detox during the week, still eat healthy on the weekends.

Thanks to my dear friend Joanna's Pinterest board, I made a few new recipes for us to enjoy this week. First up, Sarcastic Cooking's Blackened Chicken with Cilantro Lime Quinoa.  This turned out quite tasty!  I pretty much followed her recipe to the t so go check it out.

Photo from Sarcastic Cooking

For lunch, I made this Asian Slaw with Ginger-Peanut Dressing from Once Upon a Chef. Also pretty tasty.  One pointer, take her instructions to buy prepared coleslaw mix and shredded carrots... or at least buy the shredded carrots.  Those suckers are hard to shred by hand (surprisingly I didn't have a kitchen gadget to tackle the task) and I ended up with WAY more cabbage than we'll ever be able to eat.  But on the positive side, it was about time for me to buy cabbage... 30 years old and had never bought cabbage.

Photo from Once Upon a Chef


Creamed Chicken over Polenta

Thursday, March 1, 2012

I try to cook seasonally, but this just sounded perfectly warm and delicious on a chilly night when we were both trying to kick a lingering cold.  I have made this recipe once before when I lived in Dallas, and thought about it last week. I'm sure it's amazing using end of summer tomatoes, basil and late summer corn, but it's still pretty tasty in the winter on a chilly night.

Creamed Chicken and Corn Over Polenta
Adapted from Gourmet via Epicurious

For the Creamed Chicken
2 ¼-inch thick slices of pancetta, diced
4 bone-in, skin-on chicken breast halves
2 cups fresh corn (I used frozen)
1 cup milk (don't need this extra milk if using frozen corn)
2 tablespoons unsalted butter
2 tablespoons all-purpose flour
1¼ cups heavy cream (I use skim milk)
½ teaspoon black pepper
1 teaspoon kosher salt
3 large plum tomatoes, seeded and finely diced (I forgot to add these! But my plan was to roast cherry tomatoes which I love to do during the winter)
¼ cup chopped fresh basil

For the Polenta
6 cups water
2½ teaspoons kosher salt
1½ cups instant polenta
½ lb Fontina cheese (preferably Italian), diced
½ cup finely grated parmesan

To make the polenta, bring water to a boil and season with salt.  Slowly pour polenta into boiling water while whisking constantly.  Cook for 3 to 5 minutes, according to the package instructions.  Stir in cheeses.  Pour polenta into a greased baking dish and allow to cool.  This can be done a day or two ahead of time.  Cut polenta into individual pieces and reheat in a nonstick skillet.  For this recipe, I prefer the contrasting texture of this polenta preparation rather than the softer texture poured straight out of the pot.  Plus, one less thing to cook for a week night meal.

Preheat the oven to 350°. Season chicken with salt and pepper and bake until just done... about 30-45 minutes.

While the chicken is cooking, cook the pancetta in a large skillet until crispy. Remove and drain on paper towels. In that same pan, melt the butter and add flour.  Whisk the roux for about 2-3 minutes while the raw flour taste bubbles away.  Slowly whisk in 1¼ cups milk.  Bring to a boil and then reduce to a slow simmer until it thickens, about 5 minutes. Add frozen corn and tomatoes, reduce heat to warm and cover.

When the chicken is done, shred it into bite size pieces and stir it into creamed corn mixture.

Assemble-- polenta squares, topped with creamed chicken and corn, sprinkle with pancetta and top with fresh basil.

The 1950's Housewife Appetizer

Wednesday, February 22, 2012
For some reason, this appetizer makes me think of a 1950's Housewife.  I think you'll feel the same when you see the ingredient list.  I needed something quick and easy to make and preferably with ingredients that I had on hand.  After consulting my mom, she suggested this cheesy onion dip and I was not disappointed.


Cheesy Onion Dip

1 cup mayonnaise (I used Hellman's Light, much to my mother's dismay)
8 oz cheese (I used swiss, white cheddar and Parmesan but use whatever you have or enjoy.  If you don't have a food scale, go buy one!  Or just use 2 cups grated cheese)
1 onion, diced (about 1½ cups)
Scallions

Combine ingredients, bake at 350 until bubbly and golden brown.  Delicious with crostini or fritos scoops!


Random Bacon Post

Tuesday, February 7, 2012
For me, bacon is a food group (along with cheese and butter, of course).  Because of that, we always have bacon in the apartment. It's an essential ingredient in some of my go-to quick dinners-- breakfast for dinner and spaghetti carbonara.  But even we can't finish a package of bacon before it's past its prime, so it usually ends up in the freezer. Then I get annoyed when all I want is a few slices of bacon, but it's one solid mass (oh the serious problems I face). So imagine my excitement when I read this tip in Cooks Illustrated... before you freeze bacon, roll each slice separately with parchment paper, then you easily unroll it when you're ready, take what you want and put the rest back in the freezer.


Genius (yet so simple).

Appetizer Turned Dinner

Monday, January 30, 2012
Not much of a weekend recap picture wise today, but that doesn't meant it wasn't a great weekend. There was organizing, cooking, and general catching up.  Just what I needed (although there is never enough time!).

Instead of the usual weekend recap, I think I'll share what has become a favorite appetizer recipe. Just in time for the Super Bowl if you need an idea!  And in the rare instance that there are leftovers, you can turn it into an easy week night dinner.


Marinated Tomatoes and Goat Cheese
From All Things Good -- Cathedral Parish of Saint Andrew

2 pints grape tomatoes, halved
1 Tbs red wine vinegar
2 cloves garlic, halved
1 Tbs capers
1/4 cup dried basil (see note below)
 ~    olive oil
 ~    goat cheese
 ~    salt

Preheat oven to 225°. Lightly oil a baking sheet, and place tomatoes, cut-side down, on the baking sheet. Sprinkle with salt and bake for 2 to 2.5 hours.  


While tomatoes are cooking, combine vinegar, garlic, capers and basil in a covered container.  When tomatoes are done cooking (they will be softened and a little carmelized around the edges) add them to the container and cover with olive oil.  Refrigerate at least overnight.  

Serve at room temperature over goat cheese with crackers, crostini or pita chips.

Note: My mom always substitutes fresh basil (julienned) for the dried basil, so that's what I do too!

Leftovers into Weeknight Supper

I made this appetizer for Supper Club and since we had a smaller group that night, there were some leftovers. Andy and I don't eat appetizers before our week night suppers (although that does sound quite lovely), so I turned it into our dinner.

Boil some pasta, whatever type you have.  I used whole wheat (still on a whole foods kick) noodles.  Put a few chunks of goat cheese in a serving bowl, and right before the pasta is finished cooking, spoon a little pasta water over the goat cheese.  The heat of the water will melt the goat cheese and the starch in the water helps make a creamy, thick sauce.  Stir the mixture until it's smooth and creamy, adding more pasta water as necessary.

Drain the noodles and toss with the cheese sauce and leftovers tomato mixture. Yum!

Orange Peel Beef

Friday, January 20, 2012
I'm sure it's pretty obvious that I tend to cook very meat and potatoes, southern food, so it was a little out of my comfort zone when I tried to cook Orange Peel Beef.  It's a rarity that I crave Chinese.  I don't even know if I've ever ordered Chinese food. Pizza?  Twice a week.  Chinese food?  Twice a decade.  But I was craving it.  It sounded good, so I decided to give it a go and I'm so glad I did.  This is definitely in the dinner rotation.


Orange Peel Beef
Adapted from Dianemwj on Allrecipes

¾ pound beef top sirloin, thinly sliced
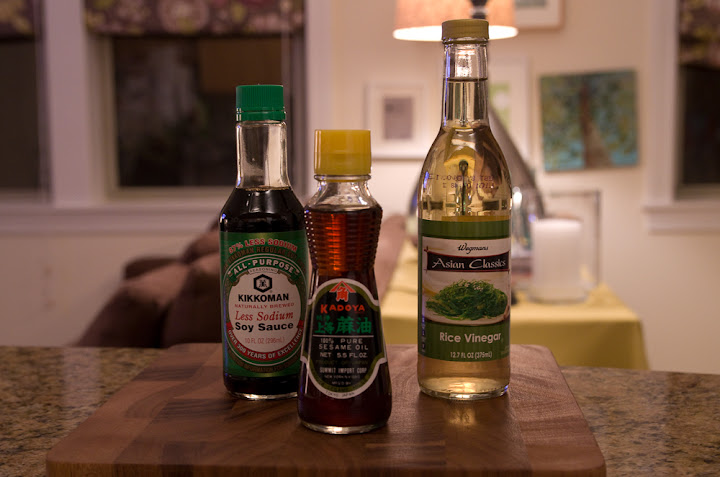
1 tablespoon low-sodium soy sauce
1 tablespoon cornstarch
1 teaspoon dark sesame oil
½ teaspoon baking soda
2 tablespoon low-sodium soy sauce
½ cup orange juice
2 tablespoon rice vinegar
2 teaspoon dark sesame oil
2 tablespoon brown sugar
1½ teaspoon cornstarch
1 tablespoon peanut or vegetable oil
4 cloves garlic, minced
2 tablespoon minced fresh ginger root - tip: peel the ginger and keep it in the freezer in a freezer bag and then just grate it on a microplane.  so easy!
2 tablespoon finely shredded orange zest
¼ teaspoon red pepper flakes
Green onions

Yeah, I know, the ingredient list looks overwhelming.  But!  Once you buy the basics, it's easy and the perfect weeknight meal as it comes together very quickly.


Combine the beef, 1 tablespoon of soy sauce, 1 tablespoon cornstarch, 1 teaspoon sesame oil, and baking soda in a bowl and mix thoroughly. Cover and refrigerate 1 to 3 hours.

Heat peanut/vegetable oil in a wok or large, nonstick skillet over high heat. Add the beef; cook and stir until the beef begins to brown and crisp, about 5 minutes. Remove the beef from the pan and set aside.

To the same pan, add garlic, ginger, orange zest, and red pepper flakes, and cook until the garlic begins to brown, 20 to 30 seconds.


Whisk together 2 tablespoon soy sauce, orange juice, rice vinegar, 2 teaspoons of sesame oil, brown sugar, and 1½ teaspoons cornstarch in a small bowl. Add the mixture to the pan and cook until the sauce has thickened and turned clear. Toss sauce and beef together and serve over brown rice and garnish with green onions.

Short Ribs

Thursday, January 12, 2012
On Sundays, we like to put something in the oven or crock-pot early in the day and let it cook all day.  Then we have a homey Sunday night supper (and a great smelling apartment), plus leftovers to enjoy later in the week.  A few Sundays ago, we started out with this...


and this...


but ended up eating this...


Yeah, 1 + 1 does not equal 2 in this scenario.  Although I'll never complain that I have to eat 2 Amy's, it wasn't what we had planned.  Either I overcrowded the dutch oven or the cooking time in the recipe was a little off, but they weren't done when it was supper time.  I'm sure it was me, not Ina!

The good news was that we had a delicious meal waiting for us on Monday night.


Ina Garten's Beef Short Ribs -- I pretty much followed her recipe exactly, which is quite unusual for me!  Just start this earlier in the day, rather than later in case, you too, have stubborn short ribs.  You want them tender and falling off the bone.

Kitchen Tool We All Need

Tuesday, January 10, 2012
Since I filled my Match tureen with clementines and red berries during the holidays, I was left with an abundance of clementines after we put away the decorations.  Not such a bad problem to have especially since Andy and I are post-holiday detoxing (more on that later) and fresh squeezed juice is acceptable!

I borrowed the Chef'n Citrus Juicer from my friend Stacy, and I was hooked.  Why don't I own one of these?


Not only did I squeeze all of our clementines (that we didn't eat whole), I also squeezed our lemons and limes.  We've been going through the citrus fruits during this detox-- turns out lemon juice almost makes you forget that you're not allowed to salt your food!

A Simple Salad

Tuesday, December 6, 2011
I am not a salad person.  Heck, I'm not a vegetable person.  Cheese, pizza and bacon top the list of my favorite foods, but sometimes a meal needs a leafy green salad.  Thanks to a trick that my friend Joanna taught me, I've found a salad that I make not because I feel like I have to, but because I actually enjoy it.

Salad Prepped - Waiting to be Dressed at the Pizza Party!

The simple trick that Joanna taught me-- you chiffonade the lettuce.  Yeah, yeah, I know you're thinking "how can the way you cut the lettuce, make it taste better?"  Well, I don't know how, but I know it definitely does!  With a sharp knife, cut the lettuce into strips as thin as you easily can-- try it!


Simple Salad

Romaine Lettuce, chiffonade cut and washed
Red Onions, thinly sliced
Parmesan Cheese, shaved into big slices with a vegetable peeler

This is just what I used, but obviously toss in whatever you love.  Just make sure you chiffonade the lettuce!


Simple Vinaigrette

2 parts olive oil
1 part red wine vinegar + more if you like your dressing tangy
1 dollop dijon mustard (I love Maille which is interesting because I don't like mustard)
Salt and pepper to taste

Whisk everything together and toss with the lettuce right before serving.

Pizza... a whole post about pizza

Tuesday, November 8, 2011
It's no secret that pizza is my favorite food. I literally could eat it every day, twice a day even and never tire of it. It's just the perfect, versatile vehicle for whatever you want... breakfast pizza with eggs and bacon, quattro formaggio for the cheese obsessed in me, you can even make a dessert pizza. It can be cooked in the oven or on the grill when the weather is nice or in a pizza oven in your backyard kitchen (not that I've dreamed about that or anything). Really, who doesn't love it?


See? Versatile!  If you tear a hole in the dough, no big deal! I decided it was finally time to find and write down my go to recipes for pizza.  This weekend I made a batch of dough, invited some friends over to help, eat and critique and here are the results.

My Favorite Pizza Combinations:
  • Margarita- Tomato Sauce, Mozzarella, Fresh Basil 
  • Sausage, Caramelized Onions, White Sauce and Mozzarella Cheese - pretty self-explanatory
  • Pesto, Pancetta, Mozzarella and Ricotta (thanks for the ricotta addition, Sticky!)

This was all that was left. We ate the pizzas hot out of the oven-- no time to take pics!

Tips, Thoughts
  • If you're using fresh mozzarella packed in water, make sure to squeeze out/drain off as much of the water as you can so the pizza isn't soggy
  • Precook any meats.  This is pretty obvious for some meats (like sausage) but for others (like pancetta), it helps to start the cooking before topping the pizza as the pizzas don't stay in the oven, on the grill for too long!
  • Prep and cook on a piece of parchment paper.  Tear off a piece of parchment, sprinkle it with cornmeal, press out your dough.  Then all you have to do is slide that into the oven on top of the pizza stone.  It makes removing the cooked pizza so easy since you can just grab a corner of the paper and slide it back onto the pizza peel.

 
  • While your shaping the pizza crust, if the dough springs back, stop and let it rest for a 5-10 minutes.  This will let the gluten simmer down and then you can stretch the dough again.
  • Maybe one day I'll be able to toss pizzas (Linda, I hear you're a pro! Maybe I can get a lesson some time), but it the meantime, this is what I do.  Start with the ball of dough, flatten into a disc and then just keep flattening and pushing outward until you form a round pizza crust.
  • Pizzas are very party friendly!  You can do most of the prep work before your friends, family comes over.  Then have everyone top their own pizzas.  It helps that I have a few ovens at my disposal considering our friends are our neighbors, but the good thing is that the pizzas don't cook for long, so you can just keep the oven burning!
Mise en Place
Pizza Prep

 
  • You could substitute all purpose flour for the bread flour but don't... just go buy the bread flour, it's worth it.
  • Weigh your flour, it's much more accurate.  Also, I weigh my dough balls to ensure they're the same size.


Pizza Dough
Adapted from Baking Illustrated
Makes 3 medium pizzas

I've found this dough to be both forgiving and flexible.  You can let it rise immediately after kneading it, so that it's ready in a couple of hours for forming crusts and topping.  Or you can let it rise overnight in the fridge and then continue to rise at room temperature the following day.  This is great because you can do what works for your circumstances.  Be sure to read the whole recipe for each method.

½ cup warm water (about 110 degrees, or 25ish seconds in the microwave)
1 envelope (about 2¼ tsp) instant yeast (same thing as Fleischmann's Rapid Rise)
1¼ cups room temperature water
¼ cup olive oil
22 oz (approximately 4 cups) bread flour, plus more for dusting
1½ teaspoons salt

In a bowl or a liquid measuring cup, add the water and then sprinkle in the yeast.  Let it stand until the yeast swells and dissolves.  Add room temperature water and olive oil.

Combine the flour and salt in a large (at least 11 cup) food processor bowl with the plastic dough blade.  While pulsing, slowly pour in the liquid ingredients reserving a few tablespoons.  The dough should easily form a ball, if not add remaining liquid until it does.  Process the dough for approximately 30-60 seconds longer until it's smooth.  You can also prepare the dough in your stand mixer or by hand.

Liberally flour your clean counter and turn out the dough from the bowl.  It will be pretty sticky.

Straight from the food processor
Flour your hands and knead a few times until it's smooth.

After a few kneads
Form a round ball and place in a large, oiled bowl.  Cover with plastic wrap and let rise in a warm spot until doubled in size, 1½-2 hours.

Ready to Rise
If you want to prepare your dough ahead of time, here's what you do. First, reduce the amount of yeast to 3/4 teaspoon and then proceed with the recipe as written above. Instead of leaving it to rise in a warm spot, place it in the fridge.  The original recipe says to leave it in the fridge for no more than 16 hours.  Mine was in there close to 24 and it was just fine.  About 4-6 hours before you're ready to pizza prep, remove the dough from the fridge and allow it to rise until it's doubled in size.

After your dough has doubled in size (whichever way you get there), punch the dough to deflate it and divide it into 3 equal size pieces.  At this point, I still had some time before I was ready to prep so I put my little dough balls back in the fridge (covered with plastic wrap) until I was ready.  Just let them come to room temp before proceeding.

Shape your crust, top with toppings and bake on a pre-heated pizza stone at the highest temperature your oven will allow until the crust has browned and the cheese is bubbling.

Tomato Sauce

1 28oz can crushed tomatoes (I like the Muir Glen Organic variety with basil that you can find at Whole Foods)
1 tsp brown sugar
2 cloves garlic, minced
2 Tbs olive oil

Heat olive oil in a sauce pan.  Add garlic and sizzle for a couple of minutes.  Then add tomatoes and brown sugar.  Bring to a simmer and cook for about 30 minutes or until it's thickened up.  Salt and pepper (or red pepper) to taste.


Garlic White Sauce

My basic formula for a white sauce is 1 to 1 to 1-- that's 1 Tbs butter to 1 Tbs Wondra flour to 1 cup milk.  I deviate slightly from that ratio when I make it for pizza as I want it a bit thicker, so I cut the milk by ½.

2 Tbs butter
2 Tbs Wondra flour (I suppose you could use all purpose flour, but go buy some Wondra and keep it in your fridge, you'll be thankful)
3 cloves garlic, minced
1 cup milk (I tend to use skim because that's what we have in the fridge)
Parmesan cheese, grated

In a skillet, melt the butter.  Sprinkle flour into skillet while whisking.


Whisk, whisk, whisk while you cook out the raw flour, about 3 minutes.  Add the minced garlic and continue to whisk for another minute or two.


While this mixture is cooking, heat your milk, not to the point of a boil but warmer than room temperature.  This will help the sauce come together.

Add the milk SLOWLY to the butter and flour mixture.  SLOWLY.  Add a little, whisk until it's combined.  Add a little more, whisk a little more.  This will help you achieve a smooth sauce.  After all the milk is incorporated, bring the mixture to a simmer and simmer until thickened.

You know the spoon trick, right?  If you draw a line and it stays, your sauce has thickened!
Stir in the cheese.  Season with salt and black pepper.

Want Some Polenta with That?

Wednesday, October 26, 2011
Oops!  Realized I didn't include in the previous post my recipe for polenta.  Not that you really need a recipe but for documentation purposes, here's what we did.

Creamy Polenta

3 cups reduced fat milk + more as needed
3 cups chicken broth + more as needed
Kosher salt
1½ cup yellow stone-ground cornmeal 
½ cup freshly grated Parmigiano-Reggiano + more for sprinkling
4 Tbs butter

In a large saucepan or deep skillet with a cover, bring milk and chicken broth to a boil.  Add 2 teaspoons of salt and then slowly whisk in cornmeal.  Continue to whisk until all the cornmeal is incorporated. Reduce the heat so that the polenta is just slightly bubbling and cover.  Continue to stir periodically and add more liquid if necessary (I feel like I always add more).  You want it to keep a creamy consistency, not firm or dry.

After it's fully cooked which takes about 30-40 minutes, stir in the butter and Parmesan.  Season with salt and pepper.

Fall Supper and Cocktail

Tuesday, October 25, 2011
If I do say so myself, I think this is the perfect fall dinner party menu-- Pork Ragu over Creamy Polenta,  Granny Smith Apple & Blue Cheese Salad and Andy's Spicy Ginger Cocktail. While this might be the perfect menu, I still have plenty of room to improve with my food photography but who likes a recipe with no picture?  Not this girl.


Pork Ragu
Adapted from Dinner a Love Story

3 pound boneless pork shoulder roast
salt and pepper
2 tablespoons olive oil
1 small pat butter
1 large can whole tomatoes with juice
1 small can diced tomatoes with juice
1 cup red wine
7 sprigs fresh thyme
7 sprigs fresh oregano
Small handful of fennel seeds
1 tablespoon hot sauce

Preheat oven to 325 degrees.  Alternatively, you can do this in the crockpot.  It works wonderfully that way as well.

Generously season the pork with salt and pepper. In a dutch oven (we LOVE our Le Creuset 5qt Oval French Oven), combine butter and olive oil and heat over medium high heat.  Sear pork on all sides until brown.  Add tomatoes, wine, thyme, oregano, fennel and hot sauce and bring to a boil.  Cover and place in the pre-heated oven.  Cook for 3-4 hours, turning every hour or so, until it's literally falling apart.  The liquid should be about 1/3 of the way up the pork so adjust accordingly.

If you're using the crock pot, after you sear the pork, deglaze the pan and cook on low for 6-8 hours.

When the pork is done, remove it from the pot and shred it with a fork.  I strained the sauce so that the liquid was in a bowl and the tomatoes and herbs were in the strainer.  Then I removed the thyme and oregano stems from the tomato mixture and skimmed the fat off the liquid.  I added the tomato mixture back to the pork and poured the liquid until I had just as much as I needed.  Ours had a lot of liquid so this was necessary, but it might not be for you.


Granny Smith Apple and Blue Cheese Salad
Adapted from Creating a Stir in the Bluegrass and Beyond

Salad
1 head green leaf lettuce, torn into bite-size pieces
1 or 2 Granny Smith apples, peeled and chopped
4 oz blue cheese, crumbled

Poppy Seed Dressing
½ cup vegetable oil
¼ cup apple cider vinegar
1½ tsp minced onion
¼ tsp paprika
¼ tsp Worcestershire sauce
1 Tbs poppy seeds

Place lettuce in a large bowl; add apple and cheese. Whisk or blend together all dressing ingredients, except the poppy seeds, until combined. Whisk in poppy seeds. Add dressing to salad and toss to coat. Serve immediately.


Andy's Spicy Ginger Cocktail (nominations are being accepted for an official name)

Syrup
3 cups water
2 cups sugar
¼ lb+ ginger, peeled and chopped
20 all spice berries, cracked
16 whole cloves
2 cinnamon sticks

Combine all ingredients in a sauce pan and bring to a boil.  Simmer until it has reduced and is syrupy (technical word), about 30 minutes.  Cool mixture and then strain.

Fill a double old fashioned with ice.  Add 2 oz of bourbon, 1 oz syrup and top with club soda, about 2 oz.

Recipe updated November 26, 2011

The Not-Paella Paella

Thursday, October 20, 2011
I love the Everyday Food app for my iPhone. The recipe shuffle turns the "what are we going to have for dinner" question into a little game.  Much more enjoyable than wandering around the grocery trying to be inspired.  Well, yesterday the Easy Paella recipe popped up and it sounded appealing.


But we don't eat shrimp so that had to go which left us with sausage and rice (the recipe doesn't even call for saffron... guess that's not "easy").  Don't think you can call that paella any more!  Regardless, dinner was delicious, pretty healthy and hands-off after the initial 20 minutes of prep.  Pretty good start to trying to cook dinner again.


So yeah, promise this isn't becoming a food blog!  As I try to get back into the swing of things, cooking comes first.


The Not Quite Paella Paella
Adapted from Everyday Food's Easy Paella

2 tablespoons olive oil
3/4 pound medium shrimp, peeled and deveined - if using
1 (12 ounces) chicken sausage, sliced in 1/2-inch rounds
1 medium onion, finely chopped
2 cloves garlic, minced
1 1/2 cups long-grain rice
1/4 teaspoon paprika
1/4 teaspoon ground turmeric
1 can (14.5 ounces) diced tomatoes - don't drain
2 cans (14.5 ounces each) reduced-sodium chicken broth
Coarse salt and ground pepper
1 cup frozen green peas

I skipped this step but just in case you're a shrimp lover, I've included Martha's directions if you're including shrimp.  In a heavy bottom, large saute pan, heat 1 tablespoon oil over medium-high heat. Cook shrimp until just pink on both sides, 4 to 5 minutes (do not overcook). Transfer to a plate.

Add remaining tablespoon of oil and sausage to pan that's preheated over medium-high heat.  Cook until brown and crispy. Add the onion and cook until translucent and soft. Add garlic and rice to the pan and stir until the rice is coated and starts to look translucent.

Add chicken broth, tomatoes in their juices, paprika and turmeric. Turn heat up to high and stir, making sure to get the browned bits off the bottom of the pan.  Season with salt and pepper.

After the mixture has come to a boil, reduce the heat, cover and simmer until rice has cooked through and absorbed the liquid. Stir in the frozen peas which will quickly heat through. Add cooked shrimp if you wish and serve immediately.